There are no items in your cart
Add More
Add More
| Item Details | Price | ||
|---|---|---|---|

{{DATE}}
What is SonarQube:
SonarQube is an open-source platform used for the continuous inspection of code quality to perform automatic reviews with static code analysis to detect bugs, code smells, and security vulnerabilities in your codebase. It provides insights into the health and maintainability of your code, helping teams deliver better software.
Role of SonarQube in CI/CD:
In a CI/CD pipeline, SonarQube plays several crucial roles:
Code Quality Analysis:
SonarQube analyzes your codebase and provides detailed reports on code quality metrics, such as code duplication, complexity, and maintainability.
Bugs and Vulnerabilities Detection:
SonarQube identifies potential bugs, security vulnerabilities, and code smells in your code, allowing developers to address them early in the development process.
Integration with CI/CD Tools:
SonarQube integrates seamlessly with popular CI/CD tools like Jenkins, GitLab CI/CD, and Azure DevOps, enabling automatic code analysis as part of the build and deployment process.
Continuous Feedback:
By integrating SonarQube into CI/CD pipelines, teams receive continuous feedback on code quality, allowing them to make informed decisions and prioritize technical debt reduction efforts.
Installation Steps:
sudo apt-get update 3. Install Open JDK 17 using the below command.
sudo apt-get install openjdk-17-jre
4. SonarQube needs a database. We will install PostgreSQL.
i. First, add GPG key of PostgreSQL repository by running the following command
`wget -q https://www.postgresql.org/media/keys/ACCC4CF8.asc -O - | sudo apt-key add -`ii. Add the PostgreSQL repository for Ubuntu
`sudo sh -c 'echo "deb http://apt.postgresql.org/pub/repos/apt/ `lsb_release -cs`-pgdg main" >> /etc/apt/sources.list.d/pgdg.list'`
iii. Now let's update ubuntu repository package index
`sudo apt-get update`iv. Let's install PostgreSQl 15 by running below command`sudo apt install postgresql-15`
v. Check if Postgresql service is enabled by running below command. It should show enabled`sudo systemctl is-enabled postgresql`vi. Check if Postgresql service status running below command. It should show the status
`sudo systemctl status postgresql`
vii. Now we need to create database and user for SonarQube. Let's login to to the PostgreSQL shell using below command.
`sudo -u postgres psql``CREATE USER sonarqube WITH PASSWORD 'Password';` `CREATE DATABASE sonarqube OWNER sonarqube;` `GRANT ALL PRIVILEGES ON DATABASE sonarqube TO sonarqube;`ix. Now lets check the database and users
` \l`` \du`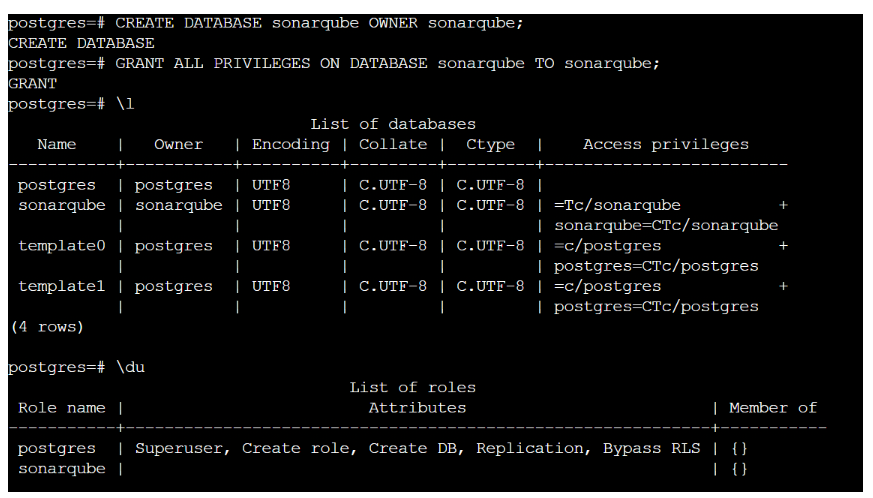
x. Logout from PostgreSQL shell using the below command.
\q
5. Now let's install SonarQube
I. SonarQube needs a dedicated user. Run the below command to create a User
sudo useradd -b /opt/sonarqube -s /bin/bash sonarqubesudo vim /etc/sysctl.conf
Properties: vm.max_map_count=524288 fs.file-max=131072
iii. Run the sysctl command below to apply new changes on the '/etc/sysctl.conf' file.
sudo sysctl --system
iv. Create a new config file '/etc/security/limits.d/99-sonarqube.conf' using the following command.
sudo vim /etc/security/limits.d/99-sonarqube.conf
and add below configuration to that file
sonarqube - nofile 131072 sonarqube - nproc 8192v. Install unzip and wget using below command. sudo apt-get install unzip wgetvi. Download SonarQube package using below commandsudo wget https://binaries.sonarsource.com/Distribution/sonarqube/sonarqube-9.9.5.90363.zip
vii. Unzip Sonarqube zip file
sudo unzip sonarqube-9.6.1.59531.zip
viii. Move the directory 'sonarqube-9.6.1.59531' to the '/opt/sonarqube' using the below command.
sudo mv sonarqube-9.6.1.59531 /opt/sonarqube
ix. Change the ownership of the SonarQube installation directory '/opt/sonarqube' to the user 'sonarqube' via the chown command as below.
sudo chown -R sonarqube:sonarqube /opt/sonarqube
x. First lets add the Postgre database details into SonarQube properties by editing /opt/sonarqube/conf/sonar.properties
sudo vim /opt/sonarqube/conf/sonar.properties
and add below details
sonar.jdbc.username=sonarqube sonar.jdbc.password=Passwordsonar.jdbc.url=jdbc:postgresql://localhost:5432/sonarqube
comment below property
#sonar.search.javaOpts
Uncomment below properties
sonar.web.host=127.0.0.1
sonar.web.port=9000
sonar.web.javaAdditionalOpts=-server
sonar.log.level=INFO
sonar.path.logs=logs
xi. Now, we will set up the systemd service file for SonarQube by using the systemctl command. Run the following command to create a new systemd service file '/etc/systemd/system/sonarqube.service'.
`sudo vim /etc/systemd/system/sonarqube.service`
[Install] WantedBy=multi-user.target
xii. Reload the systemd manager by using the following command.
sudo systemctl daemon-reload
xiii. Start the SonarQube service by running the below command
`sudo systemctl start sonarqube.service`
xiv. Enable the service
`sudo systemctl enable sonarqube.service`
xv. Check the status of SonarQube by running below command`sudo systemctl status sonarqube`xvi.Open your browser and type http:host-ip:9000. You should something like below if your sonar-server is up and running.
xvii. The default username and password is admin/admin. Log in using admin/admin and reset your password.
To install sonar along with postgresql and a proxy server Nginx use below shell script in your AWS instance user data.
cat < /etc/systemd/system/sonarqube.service [Unit] Description=SonarQube service After=syslog.target network.target
[Service] Type=forking
ExecStart=/opt/sonarqube/bin/linux-x86-64/sonar.sh start ExecStop=/opt/sonarqube/bin/linux-x86-64/sonar.sh stop User=sonar Group=sonar Restart=always LimitNOFILE=65536 LimitNPROC=4096 [Install] WantedBy=multi-user.targetEOTsystemctl daemon-reloadsystemctl enable sonarqube.service#systemctl start sonarqube.service#systemctl status -l sonarqube.serviceapt-get install nginx -yrm -rf /etc/nginx/sites-enabled/default rm -rf /etc/nginx/sites-available/default cat < /etc/nginx/sites-available/sonarqubeserver{listen 80; server_name sonarqube.groophy.in;access_log /var/log/nginx/sonar.access.log; error_log /var/log/nginx/sonar.error.log; proxy_buffers 16 64k; proxy_buffer_size 128k; location / { proxy_pass http://127.0.0.1:9000; proxy_next_upstream error timeout invalid_header http_500 http_502 http_503 http_504; proxy_redirect off; proxy_set_header Host \$host; proxy_set_header X-Real-IP \$remote_addr; proxy_set_header X-Forwarded-For \$proxy_add_x_forwarded_for; proxy_set_header X-Forwarded-Proto http; }}EOT ln -s /etc/nginx/sites-available/sonarqube /etc/nginx/sites-enabled/sonarqube systemctl enable nginx.service #systemctl restart nginx.service sudo ufw allow 80,9000,9001/tcpecho "System reboot in 30 sec" sleep 30 reboot

{{AUTHOR}}
Solution Architect
 Launch your Graphy